Saturday, April 28, 2007

music - my round robin ab theme

one of the altered books that i did for a round robin was "music" and participants could put in their feelings about music, their favorite music, their favorite artists, and more. before sending the book out, i did a few pages to get it started. this helps the other participants to see what your art style is like, to see maybe what you are expecting from them, or to provide ideas on what you might like them to do. you can always send a list of requests, too, such as "no smoking, no perfumes or incense, no nudity, etc". some people put very detailed lists of instructions and other people are more open to see what they get back.

after doing my first round robin, my main request after that was to not smoke and to not use perfume or incense in my book. i can understand how people who are used to that might like it, but you never really know what smell is going to be offensive to other people. there were a couple books that smelled so bad that i had to leave them in the garage to air out before bringing into the house to work on them.

in any round robin book, it's good to put a list of the players for that round robin. that way, in case anyone get confused or the book gets lost, hopefully it can be sent on to the next person or back to the owner. this also helps the book owner to remember who the participants were when the book returns home. usually each book has a sign-in page where participants somehow leave info on where their own artwork is located and this is commonly done w/ some sort of tags and/or tag art.

i used just a plain piece of brown paper for the background and then used gold ink to make a swirling pattern on the page. then i printed out the info i needed and the titles on natural parchment paper (to look like old sheet music pages) and glued to the background. for the players' privacy, i have blotted out their addresses from this project.

another page that i did in this book before sending it out was to resemble the old-fashioned juke boxes that were located at each table in diners. people could peruse the list of available songs and then make their choices. this juke box has pages to flip through, but the middle pages contained the name of the players in the round robin and the theme of their book.

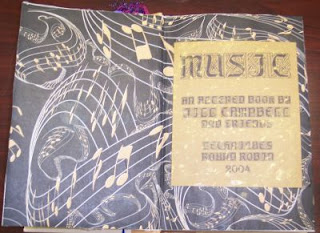
inside the front and back covers, i papered them to match and used the front one as a title page. the background is just a piece of scrapbook paper patterned with music. the title of the book and other info is printed off on gold parchment paper to match the pattern on the background paper.
the last page that i did before sending the book out was a random page of quotes concerning music. it really is amazing the famous quotes and inspirational sayings about music. i used and piece of scrapbook paper for the background that looked like it had been dyed in a random pattern. i printed out the quotes on the natural parchment paper and then tore them so they would have ragged edges.

the most exciting part of being in an altered book round robin is waiting for your own book to return home so you can see what other people have done in your book. it's amazing the amount of very talented artists who participate in these round robins and the fantastic artwork that is shared. it's very inspiring and pushes each artist to keep up to the level of the other people who have been working in the book.
i haven't done a round robin on anything in the last two years, though, because it got to where it was fairly common for someone in a group to disappear -- usually while they were in possession of someone else's book(s) and artwork. it's very disappointing to have your project lost, especially since you are so looking forward to it's safe return back home.
this didn't happen to me, but it did happen to my daughter. the really bad thing, though, was that it was the group leader who disappeared and was never heard from again. she didn't return phone calls, couldn't be found, didn't return mail or email -- the book was just gone. even worse -- she was the last person to work on the book before it was to come home to my daughter, so my daughter was getting really anxious to see all the neat stuff in her book . . . . . only to find out that it was lost. that situation was the final deal for us in doing round robins.
but, i decided to do something similar but even better. i'm going to start a neat journal and pass it around to my immediate family members and have each of them regularly contribute some artwork to it. they don't know this yet, but they will know it soon! i think it will create a really neat keepsake, too!

alice in wonderland ab page

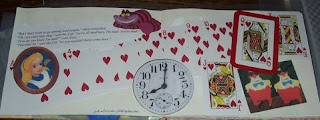
this altered book page is one that i did in a round robin where the book's theme was "children's stories". i chose "alice in wonderland" because i had recently watched "the matrix" and was comparing all the similarities of the stories in my mind. amazingly similar in many spots!

in thinking about "alice in wonderland" as a story, images came to mind of the most memorable spots in the story to me. i printed off images to match those things, including a picture of the disney version of alice, the cheshire cat, tweedledee and tweedledum, a clock (representing the rabbit who was always late), and all the heart cards in a deck w/ emphasis put on the queen of hearts.

the quote at the top says --
"But I don't want to go among mad people," Alice remarked.
"Oh, you can't help that," said the Cat "we're all mad here. I'm mad. You're mad."
"How do you know I'm mad?" said Alice.
"You must be," said that Cat, "or you wouldn't have come here."

this was a quick and fun page to do and really worked out nice because of the long area to work on. i liked this quote specifically because it so relates to the whole world at times -- sometimes it seems that we are all mad. some people know it and some people don't -- that's the only difference.

Thursday, April 26, 2007

IF - polar


IF - 4.20.07 - polar

of course there were many things that came to mind w/ the word polar, but the most obvious one to me was that of a polar bear. i've been wanting to try doing something on colored background paper w/ colored pencils -- so this was the perfect chance.

the paper was cheap brown craft paper, so i think i would've been much happier w/ it on better quality paper. i didn't realize that it would be so hard to get the color to show up working on the darker background, either. anyway, next time i'll try something on better paper and when i have more time.

this drawing was done using prang colored pencils in a 8.5 x 11 piece of brown craft paper (feels like paper sack). finished picture was sprayed w/ matte finish sealant to keep it from smearing.

first art class ever!

last week, i attended my first ever art classes since grade school. everyone in my school had art in grade school, but in high school there was no time for art if a student was on "college track".

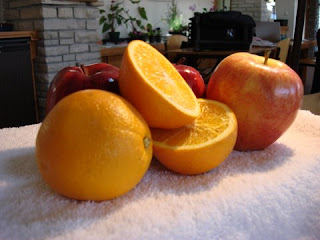
i actually took 3 days of classes, but the first day was still life drawing: fruit, flower and insect. the official description is listed on the powell gardens website. i wasn't sure how interested i was in this topic, but i was interested in getting better at drawing what i see and learning to draw from life and not just pictures.

i was really nervous about a lot of things on attending the class. what if everyone there was SO much better than me? what if i couldn't do what i was supposed to? what if my skill level just wasn't there? what if i didn't like it? what if i felt trapped? what if i was bored? what if???

well, it turned out great. the class was great, the teacher was great, the classmates were great. i had a blast and learned many new things. the most time-saving and expense-saving thing i learned, though, was to sketch out my project on tracing paper. sketch w/ NO erasing to make sure the lines were correct. i had never drawn from real life before -- i always work from photos! amazing how different this is when it comes time to do it!!!

once the still life was set up and our initial sketch was done, then we had the instructor (cynthia padilla) check our perspective and our lines before moving. the next step was to darken all of our lines on the tracing paper. this became our "original" that we used to work from.


we transfered the tracing paper sketch to a good piece of paper by taping the tracing paper on the window and tracing the lines on the good paper. i was amazed at this b/c i felt like i was "cheating" by tracing something -- even if it was my own work to begin w/.

now, after the image was traced onto the good paper in very light pencil, we could begin the next steps. if we happen to mess up at some point, then we didn't have to do the whole drawing phase again -- we just traced our image onto another good sheet of paper and moved on.

this would've saved me a tremendous amount of time and money to have known this step BEFORE now!!! i restarted the moment of rest picture 6 different times because i messed up at some point. each time i had to re-draw the picture and start from scratch. plus, each time i restarted on a "good" piece of paper, which obviously became expensive after a few sheets.

so, i now have the original to my still life and i can always start over at any time that i want/need. in class, we were to get a couple different sections done to show that we could match the colors just right. i got the left orange and the left apple done, but i haven't had time to finish any more of it since class ended.

i did take pictures, though, so i would have a good and true reference to work from later. i will finish this picture eventually because it was from my "first art class"and i'll want to have that to keep.

i can't wait to see how much difference the things i learned in the still life workshop will benefit me in my artwork, both in technique and in time-saving and money-saving ideas. it was a definite great day to be in class, too.

the second class i was in was a 2-day class of botanical art essentials. it was also fantabulous, but i'll be sharing work and lessons learned from that workshop in a later post.

Saturday, April 07, 2007

indian paintbrush

the april challenge for the botanical art group is "something red and/or something native to your area" -- so i have incorporated those 2 things into my drawing of an indian paintbrush plant. most meadows have many of these plants growing in them throughout the summer, but the flowers are really beautiful in the months of may/june/july.

this drawing was done using prang colored pencils in a 9 x 12 sketchbook of 70# white paper. finished picture was sprayed w/ matte finish sealant to keep it from smearing.

Monday, April 02, 2007

rosie the riveter ab page


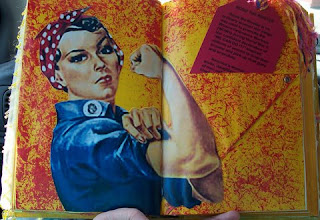
this altered book page was done in a "topics round robin" and this book's topic was "special women in history". i chose rosie the riveter because "she" is one of my daughter's favorite characters.
the idea that a woman (or a group of women) could make so much of an impact on american culture as those women who stepped up and filled the workforce while american men were off at war == totally amazing.
two pages on the right were glued/rivited together to allow the bottom of one to fold up and make the pocket to hold the tag. then the pages were painted yellow for the background and dabbed red, using a piece of wadded up plastic cling wrap dipped in the red paint. nice thing about this painting tool is that there is no clean-up. just use and throw away!
the picture of rosie was printed out on photo paper on my home printer, cut out to just the image of rosie w/ no background from the poster, and then glued in place. after the glue was dry, i finished the page by coating it w/ future floor wax.
the tag was printed out on red cardstock and tied off w/ colorful yarn through a hole punched in the end. the information on the card was the basic history of rosie's character and how her image was designed.
i liked this design so much when i was making this one that i went ahead and made all the things needed to make my own page just like it -- i just haven't assembled it yet! some day, when i have time to play w/ those things again, i'll get back to it!

wizard of oz ab pages


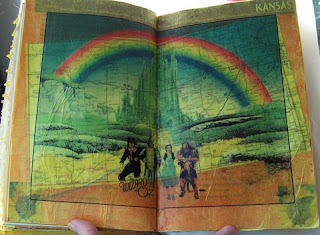
these altered book pages were done in a "colors round robin" and this book was "yellow". being from kansas, what more associated to yellow could i get than the yellow brick road and the wizard of oz?

for this page, i used a map of the state of kansas as the first layer on the book page. then i printed out the wizard of oz figures in front of the emerald city on yellow tissue. the tissue was glued down to the page using mod podge. no final finish was put on the page because i didn't want it to stick together when the book was closed.

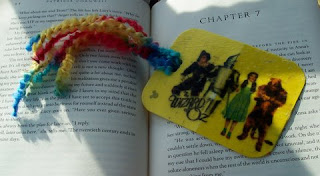
the sign-in tags for this book were various shades of yellow paint tags from the hardware store. to associate my tag w/ my page, i printed out the characters from wizard of oz on yellow tissue and glued to my paint chip. then i finished off the ship w/ some colorful yarn through a hole punched in the end.

purple ab pages

these pages were done for the "colors round robin" in the purple book. the "flights of fancy" page was started w/ a pretty sheet of scrapbook paper. next, i stamped dragonflies all over the page in a random pattern. the writing was done w/ a silver sharpie marker. a small silver dragonfly charm was glued to the page on the right. the final touch was to glue purple beaded fringe down the outside of each page.

the tag shown was completed w/ all the same materials, but it would be used in the front of the book as my sign-in tag and connected my tag to my work. all of my personal information was included on the back of the tag, too.

we were encouraged to do 2 spreads in each book, so my second spread had to do w/ the poem that says "when i grow old, i shall wear purple." the first layer on the page was a pearlescent tissue paper glued to the open page spread and trimmed to fit.

i printed out a picture of a old women in a purple hat on vellum and attached to the page on the left w/ purple flower rivets. i chose this picture just because she has a look that says she's having fun regardless of how she looks!

the page on the right has the poem "warning" by jenny joseph printed out on vellum and attached to the page w/ a bow and a knot made from many shades of purple embroidery floss.

both of these pages were fairly quick to do, but both ended up looking very nice. i'm glad i took pictures of these pages, too, so i can recreate them some day in a book to keep for myself.